unity使用Addressables进行资源管理很方便但是有一个很值得诟病的问题, 那就是catalog文件过大, 对于一个持续运营的项目来说catalog文件可能超过10M, 导致初始化Addressables时间较长, 峰值内存上涨明显.

本文通过分析catalog文件中主要的内容占用和内存开销, 提出一些可行的(已实践)方案.

一. catalog相关的开销分析

catalog 开销主要来自两个部分:

  1. 初始化Addressables 的时间开销, 使用Addressables需要确保catalog 加载完成, 对于部分网络情况不佳的用户造成卡顿较长的体验;
  2. 加载catalog文件的内存开销, 使用json格式的Addressables加载时会产生两倍于自身大小的内存开销.

加载catalog的时间开销和网络情况密切相关, 实际测试下来一个1Mcatalog文件经过传输和加载到内存, 整体时间超过1s. 主要的开销来源是文件的大小.

内存上的开销主要是加载文本本身和反序列化数据之后的结果上的内存开销.

1. catalog 本身大小开销分析

catalog文件本身是一个json文件, 主要结构如下:
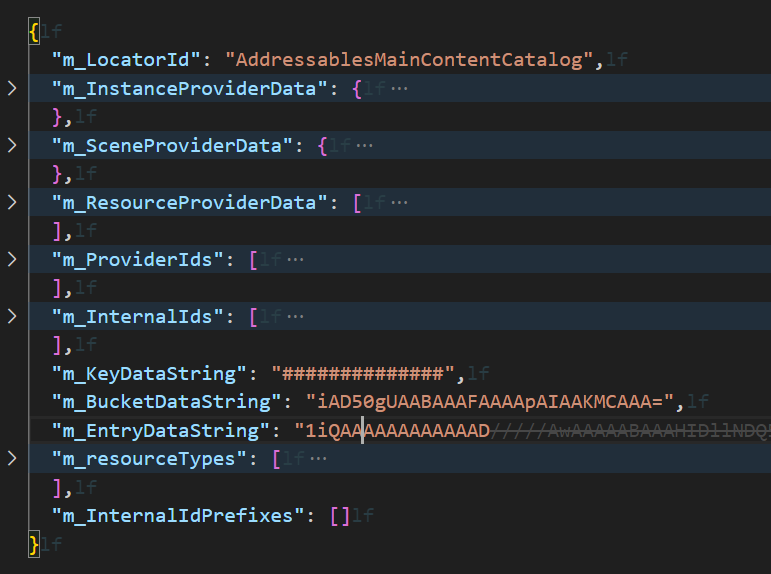
image-20240222202809424

本身实际是ContentCatalogDatajson序列化结果. 其中包含的数据是以下几类数据:

属性 数据含义
m_LocatorId Addressables支持多catalog,所以添加了区分不同catalog的ID
m_InstanceProviderData Instantiate方法使用的Provider的序列化结果
m_SceneProviderData 加载Scene使用的Provider序列化数据
m_ResourceProviderData 加载资源使用的Provider的序列化结果
m_ProviderIds Provider的类名称
m_InternalIds 资源的路径列表, 是AssetPathBase64加密结果
m_KeyDataString Key的二进制序列化结果
m_BucketDataString 哈希桶索引数据,将Key映射到对应的Entry列表,实现Key→Location的哈希表查找
m_EntryDataString 资源的Entry的序列化结果,包含资源的类型,资源的以来等
m_resourceTypes 资源的类型
m_InternalIdPrefixes InternalId列表的前缀优化数据

json文件里面能看到其中比较大的主要是m_KeyDataString m_InternalIds, m_EntryDataString 分别指向了资源的路径, 资源的key和资源的加载信息其中每一段的数据的大小如下:

1
2
3
4
5
6
catalog.json 16.30MB (3.20MB compressed)
43282 internalIds
86296 Keys:5.88MB
86296 Buckets:2.76MB
106176 Entries:3.78MB
731 Extras:802.29KB

2. catalog 加载内存开销分析

catalog加载过程中的内存峰值远大于文件本身的大小,这是因为在反序列化的过程中,同一份数据会同时存在多份拷贝

加载流程

以默认的JSON格式为例,catalog的加载流程如下:

1
2
3
4
5
6
7
8
9
10
11
12
13
14
15
16
17
18
1. TextDataProvider 加载原始JSON文本到内存
└─> File.ReadAllText() 或 UnityWebRequest.downloadHandler.text
内存中存在: 原始JSON字符串 (如16MB)

2. JsonAssetProvider 调用 JsonUtility.FromJson 反序列化
└─> 生成 ContentCatalogData 对象
内存中存在: 原始JSON字符串 + ContentCatalogData对象
ContentCatalogData包含Base64编码的字段:
m_KeyDataString, m_BucketDataString, m_EntryDataString, m_ExtraDataString
这些Base64字符串的大小约等于原始JSON

3. ContentCatalogData.CreateLocator() 构建运行时查找结构
└─> Base64解码为byte[],构建Bucket[]、object[] keys、IResourceLocation[] locations
内存中存在: 原始JSON + ContentCatalogData(Base64字符串) + 运行时结构

4. CleanData() 释放序列化数据
└─> 清空 m_KeyDataString, m_BucketDataString, m_EntryDataString, m_InternalIds
内存中仅保留: 运行时查找结构

内存峰值分析

加载过程中三份数据同时存在于内存

阶段 数据 大小估算
原始文本 JSON字符串 ~16MB
反序列化对象 ContentCatalogData(含Base64字段) ~16MB
运行时结构 ResourceLocationMap(Bucket、Key、Location数组) ~8-12MB
峰值合计 ~40-44MB

也就是说,一个16MB的catalog.json文件,加载过程中的内存峰值约为文件大小的3倍。在CleanData()调用后,序列化数据被释放,运行时只保留查找结构,内存回落到8-12MB左右。

Bundled格式(压缩本地Catalog)

Unity Addressables支持将catalog打包成AssetBundle格式(Compress Local Catalog),开启方式:

  • Inspector: Window > Asset Management > Addressables > Settings > Catalog > Compress Local Catalog
  • 代码: AddressableAssetSettingsDefaultObject.Settings.BundleLocalCatalog = true

开启后的加载流程:

1
2
3
4
1. AssetBundle.LoadFromFileAsync() 加载catalog bundle
2. LoadAllAssetsAsync<TextAsset>() 提取JSON文本
3. AssetBundle.Unload(true) 卸载bundle
4. JsonUtility.FromJson() 反序列化(同JSON流程)

Bundled格式的优势是磁盘空间和下载体积:16MB的JSON经过LZ4压缩后约3.2MB。但运行时内存峰值并不会减少,因为最终还是需要完整的JSON文本进行反序列化。

注意:Bundled格式会增加catalog的加载时间,因为多了一步AssetBundle的加载和卸载。远程更新catalog仍保持JSON格式,不受此设置影响。

二. 可行的catalog优化方案

1.剔除locations

上面分析中发现很多的开销是来在Locations也就是资源的数量, 如果假如到catalog中的资源数量较多, 自然catalog会明显增大. 那么什么是需要添加到catalog中的什么是不需要的呢? 这里项目不一样判断的方法也不一样, 这里设计了一个简单的配置正则项去筛选需要加到Catalog中的Locations用于过滤需要保留的locations. 经过过滤之后能减少2/3的location数量, 能减少大约1/3的大小.

警告:剔除Location可能会导致label丢失, 比如你给一个路径下的资源都标记为lableA,但是所有的资源Location被删除了导致label丢失. 使用这个方案请确保所有的通过Addressables加载的资源确实被保留了.

代码如下

1
2
3
4
5
6
7
8
9
10
11
12
13
14
15
16
17
18
19
20
21
22
23
24
25
26
27
28
29
30
31
32
33
34
35
36
37
38
39
40
41
42
43
44
45
46
47
48
49
50
51
52
53
54
55
56
57
58
59
60
61
62
63
public class LocationFilterConfig : ScriptableObject
{
protected virtual void Init()
{
}

// 用于子类实现自己的忽略功能
protected virtual bool IsIgnored(ContentCatalogDataEntry entry)
{
return false;
}

// 过滤的接口
public void FilterLocation(List<ContentCatalogDataEntry> locations, ref List<ContentCatalogDataEntry> output)
{
Init();
foreach(ContentCatalogDataEntry location in locations)
{
if(!location.ResourceType.IsAssignableFrom(typeof(IAssetBundleResource)) && IsIgnored(location))
{
continue;
}
output.Add(location);
}
}
}
// 具体实现
public class ResConfigLocationFilterConfig : LocationFilterConfig
{
[SerializeField]
private string[] m_includedAssets;

private Regex[] m_includedAssetsRegex;
private HashSet<string> m_internalIds;

protected override void Init()
{
m_includedAssetsRegex = null;
if (m_includedAssets != null)
{
m_includedAssetsRegex = new Regex[m_includedAssets.Length];
for(int i = 0;i < m_includedAssets.Length;i++)
{
m_includedAssetsRegex[i] = new Regex(m_includedAssets[i]);
}
}
}
// 使用正则项对资源路径进行过滤
protected override bool IsIgnored(ContentCatalogDataEntry entry)
{
if (m_includedAssetsRegex != null)
{
foreach (Regex regex in m_includedAssetsRegex)
{
if(regex.IsMatch(entry.InternalId))
{
return false;
}
}
}
return true;
}
}

2.剔除location 类型

对于同一个资源, 存在多个Entry, 其中不同的key, 不同的资源类型都会生成一个新的数据, 所以会导致同一个资源数据多很多. 这里主要是剔除key和资源类型:

2.1 剔除key

警告:剔除key可能会导致加载资源时无法找到对应的资源而加载失败, 确保你的剔除手段是合理的

剔除key的方法很简单, 在AssetGroup里面勾选是否包含部分信息.其中分别包含的信息是是否需要使用Addresses加载资源, 是否会使用AssetReference加载资源以及是否会通过Label加载资源

image-20240223114135162

2.2 剔除资源类型

对于一个资源来说, 他的资源类型有很多, 在Catalog中会生成不同类型的Entry, 比如TextAsset的资源不仅仅会存在一个TextAssetEntry, 也会产生UnityEngine.Object资源的Entry. 这里也能按照类型剔除部分的资源类型生成的Entry.

1
2
3
4
5
6
7
8
9
10
11
12
13
14
15
16
17
18
19
[CreateAssetMenu(fileName = "TypeLocationFilterConfig", menuName = "Addressables/Location Filter/Type")]
public class LocationFilterConfigType : LocationFilterConfig
{
[SerializeField]
private string[] m_types;

protected override bool IsIgnored(ContentCatalogDataEntry entry)
{
string typeName = entry.ResourceType.FullName;
foreach(string type in m_types)
{
if(type == typeName)
{
return true;
}
}
return false;
}
}

3.剔除依赖

警告:可能会导致资源加载失败, 请记得实现检查工具

依赖的数据是catalog中很大的部分, 尤其是对于依赖关系复杂的项目, 依赖的数据可能会比真实数据还多, 这里推荐使用编辑器下的资源依赖去替换使用Assetbundle计算出来的依赖关系, 减少资源的依赖数量

3.1 依赖数据在Catalog中的存储方式

ContentCatalogDataEntry中,每个资源的依赖以Key列表形式存储:

1
2
3
4
5
public class ContentCatalogDataEntry
{
public List<object> Dependencies { get; private set; } // 依赖Key列表
// ...
}

当资源有2个及以上依赖时,Addressables会创建一个”聚合依赖”条目:

  1. 将依赖列表转为HashSet<object>
  2. 计算哈希值:hash = hash * 31 + o.GetHashCode()
  3. 将此哈希值作为新Key加入Key列表
  4. 原始资源的依赖列表被替换为单个哈希Key
  5. 每个被依赖的Bundle的Key列表也会加上这个哈希值

这意味着每增加一个依赖关系,不仅会增加Entry数据,还会增加额外的Key数据和Bucket数据。对于依赖关系复杂的项目,依赖数据可能占总数据的30%-50%。

3.2 使用编辑器依赖替换AssetBundle依赖

构建时GenerateLocationListsTask计算的是展开依赖(Expanded Dependencies)——即所有传递依赖的合集。这会导致很多冗余的依赖引用。

优化思路:在构建完成后,用AssetDatabase.GetDependencies()获取资源的直接依赖,再映射回对应的Bundle,替换原始的展开依赖。

1
2
3
4
5
6
7
8
9
10
11
12
13
14
15
16
17
18
19
20
21
22
23
24
25
26
27
28
29
30
31
32
33
34
35
36
37
38
39
40
41
42
43
44
45
46
47
48
49
50
51
/// <summary>
/// 在构建流程中替换Catalog中的依赖数据
/// 在自定义BuildScript的DoBuild中,GenerateCatalog之前调用
/// </summary>
public static void ReplaceDependenciesWithEditorDeps(
List<ContentCatalogDataEntry> locations,
Dictionary<string, string> assetToBundleMap)
{
foreach (var entry in locations)
{
// 仅处理非Bundle类型的资源(即实际的Asset条目)
if (entry.ResourceType == typeof(IAssetBundleResource))
continue;
if (entry.Dependencies == null || entry.Dependencies.Count == 0)
continue;

// 从Entry的Key中找到资源的GUID或路径
string assetGuid = entry.Keys
.OfType<string>()
.FirstOrDefault(k => k.Length == 32); // GUID长度

if (string.IsNullOrEmpty(assetGuid))
continue;

string assetPath = AssetDatabase.GUIDToAssetPath(assetGuid);
if (string.IsNullOrEmpty(assetPath))
continue;

// 使用编辑器获取直接依赖(recursive=false)
string[] deps = AssetDatabase.GetDependencies(assetPath, false);

// 将依赖资源映射回其所在的Bundle
var actualBundleDeps = new HashSet<string>();
foreach (var depPath in deps)
{
// 排除自身
if (depPath == assetPath)
continue;

string depGuid = AssetDatabase.AssetPathToGUID(depPath);
if (assetToBundleMap.TryGetValue(depGuid, out string bundleName))
{
actualBundleDeps.Add(bundleName);
}
}

// 替换原始依赖
entry.Dependencies.Clear();
entry.Dependencies.AddRange(actualBundleDeps);
}
}

其中assetToBundleMap的构建方式:

1
2
3
4
5
6
7
8
9
10
11
// 从构建上下文中获取资源到Bundle的映射
var assetToBundleMap = new Dictionary<string, string>();
foreach (var group in aaContext.assetGroupToBundles)
{
string bundleName = group.Value; // bundle名
foreach (var entry in aaContext.assetEntries)
{
string guid = entry.guid;
assetToBundleMap[guid] = bundleName;
}
}

3.3 接入构建流程

将上述依赖替换逻辑接入自定义构建脚本:

1
2
3
4
5
6
7
8
9
10
11
12
13
14
15
16
17
18
19
20
[CreateAssetMenu(fileName = "CustomBuildScript.asset",
menuName = "Addressables/Content Builders/Custom Build Script")]
public class CustomBuildScript : BuildScriptPackedMode
{
protected override TResult DoBuild<TResult>(
AddressablesDataBuilderInput builderInput,
AddressableAssetsBuildContext aaContext)
{
// 在GenerateCatalog之前修改locations
// 1. 应用LocationFilter过滤
FilterLocations(aaContext.locations);

// 2. 替换依赖数据
var assetToBundleMap = BuildAssetToBundleMap(aaContext);
ReplaceDependenciesWithEditorDeps(aaContext.locations, assetToBundleMap);

// 调用原始构建流程
return base.DoBuild<TResult>(builderInput, aaContext);
}
}

在Addressables Settings中将Build Script替换为自定义的CustomBuildScript即可。

3.4 依赖剔除的效果

在一个实际项目中的优化效果:

指标 优化前 优化后 降幅
catalog.json大小 16.3MB 11.2MB 31%
压缩后大小 3.2MB 2.4MB 25%
Location数量 43,282 28,156 35%
Key数量 86,296 54,831 36%
加载内存峰值 ~44MB ~30MB 32%

注意:使用编辑器依赖替换后,必须确保运行时加载Bundle时Unity的AssetBundle依赖机制能正确处理传递依赖。由于AssetBundle.LoadFromFileAsync加载Bundle时会自动处理Bundle间的依赖关系,因此只需要保留直接依赖即可,传递依赖由Unity运行时处理。

三.总结

Addressables是一个广泛使用的资源管理库, 使用默认的方式能确保完全不会出问题, 但是不同项目有不同的实际情况, 在做库开发时适用性应该要大于效率,但是项目实际使用的情况下应当是效率大于适用.